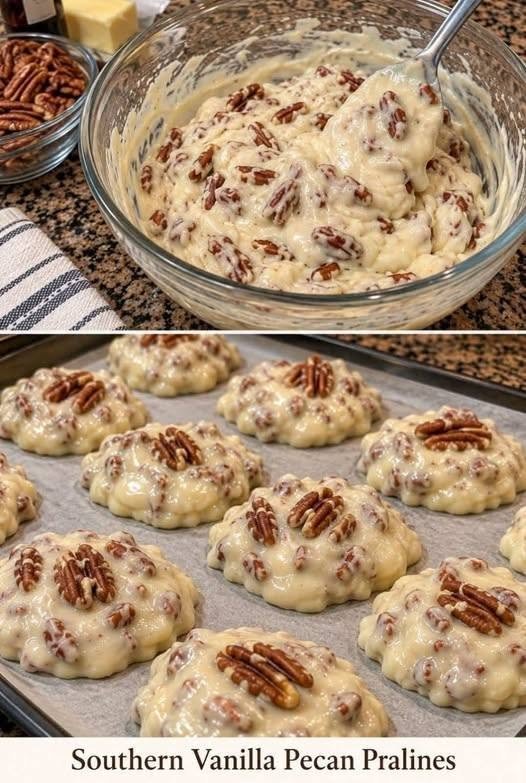
This homemade recipe is perfect for holidays, family gatherings, dessert tables, or whenever you crave an old-fashioned Southern treat. With a few simple ingredients and careful attention to the cooking temperature, you can make a batch of beautiful vanilla pecan pralines right in your kitchen.
Preparation Time: 15 minutes Cooking Time: 15–20 minutes Cooling Time: 30–45 minutes Total Time: Approximately 1 hour Yield: 12–16 pralines
Ingredients
2 cups pecan halves or roughly chopped pecans
2 cups granulated sugar
1 cup light brown sugar, packed
1 cup heavy whipping cream
4 tablespoons unsalted butter
1 teaspoon pure vanilla extract
¼ teaspoon salt
2 tablespoons water, if needed
Extra pecan halves for decorating
Step-by-Step Instructions
Step 1: Prepare Your Baking Sheet
Line a large baking sheet with parchment paper or a silicone baking mat. This prevents the pralines from sticking and makes them easier to remove once they have cooled.
Measure all your ingredients before beginning. Praline mixtures can thicken quickly after cooking, so having everything ready will make the process much easier. Keep the extra pecan halves nearby for decorating the finished sweets.
Step 2: Prepare the Pecans
If your pecans are not already toasted, spread them in a dry skillet over medium-low heat. Toast them for approximately 3–5 minutes, stirring frequently until they become fragrant.
Be careful not to burn them, as pecans can turn bitter quickly. Remove them from the heat and allow them to cool slightly.
Toasting is optional, but it enhances the nutty flavor and adds a delicious crunch to the finished pralines. You can leave the pecans whole, chop them coarsely, or use a mixture of both for different textures.
Step 3: Combine the Sugar and Cream
In a heavy-bottomed saucepan, combine the granulated sugar, brown sugar, heavy cream, and salt. Stir gently over medium heat until the sugars begin dissolving.
Use a sturdy wooden spoon or heat-resistant spatula to stir the mixture. Avoid using a thin saucepan because the sugar mixture can scorch easily.
Continue heating until the mixture begins to bubble. Once the sugar has dissolved, keep a close eye on the temperature and avoid vigorous stirring, which can encourage unwanted sugar crystallization.
Step 4: Cook the Praline Mixture
Attach a candy thermometer to the side of the saucepan, ensuring the tip does not touch the bottom. Cook the mixture until it reaches approximately 235–240°F (113–116°C), the soft-ball stage.
This usually takes around 8–15 minutes, depending on your pan and stove. Adjust the heat as necessary to maintain a steady simmer.
The correct temperature is important because it determines whether the pralines will set properly. If the mixture is undercooked, the candies may remain too soft. If it becomes too hot, the pralines may turn dry, crumbly, or overly hard.
Use caution when working with hot sugar, as it can cause serious burns.
Step 5: Add the Butter and Vanilla
Once the mixture reaches the desired temperature, remove the saucepan from the heat. Add the butter and allow it to melt into the hot mixture.
Let the mixture cool for approximately 1–2 minutes, then stir in the vanilla extract. Adding vanilla away from direct heat helps preserve its wonderful aroma.
Stir gently until the butter and vanilla are evenly incorporated. The mixture should look smooth, glossy, and creamy.
Step 6: Add the Pecans
Add the toasted pecans to the saucepan and stir until they are thoroughly coated with the sugar mixture.
Continue stirring as the mixture begins to cool and thicken. As it loses some of its gloss, it will become thicker and easier to scoop.
Work carefully but efficiently. If you wait too long, the praline mixture may become too firm to shape. If it is still extremely runny, give it a little more time to cool before forming the pralines.
Step 7: Shape the Pralines
Using two spoons or a small cookie scoop, drop generous spoonfuls of the mixture onto the prepared baking sheet. Leave approximately 2 inches between each mound.
Shape them into rounded, rustic circles if desired. Traditional pralines do not need to look perfectly uniform; their homemade appearance is part of their charm.
While the tops are still soft, gently press two or three pecan halves onto each praline. This creates the attractive pecan-topped appearance shown in the reference photo.
If the mixture begins to harden before you finish, work quickly and avoid repeatedly reheating it, as this may affect the final texture.
Step 8: Allow the Pralines to Cool
Leave the pralines undisturbed at room temperature for approximately 30–45 minutes, or until they are set enough to lift easily from the parchment.
They should develop a soft, creamy consistency while holding their shape. The exact texture depends on the final cooking temperature, humidity, and how much the mixture was stirred as it cooled.
Do not move them too early, as warm pralines can be delicate and may lose their shape.
Step 9: Serve and Enjoy
Once completely set, carefully transfer the pralines to a serving plate or airtight container. Arrange them in a single layer if they are still slightly soft, or place parchment paper between layers to prevent sticking.
Serve them with coffee, tea, or a glass of cold milk. Their buttery sweetness and toasted pecan flavor also make them a lovely addition to holiday dessert trays and homemade gift boxes.
Tips for Perfect Vanilla Pecan Pralines
Use a candy thermometer: Accurate temperature control is the most reliable way to achieve a good texture.
Choose fresh pecans: Fresh nuts provide the best flavor and crunch.
Avoid excessive humidity: Damp weather can make sugar candies slower to set or sticky.
Do not rush the cooling process: Allow the pralines to firm up naturally at room temperature.
Adjust the texture carefully: If your pralines remain too soft, the mixture may not have reached the correct temperature. Next time, cook it slightly longer within the recommended range.
Storage Instructions
Store the completely cooled pralines in an airtight container at room temperature for approximately 3–5 days, provided your kitchen is cool and dry. For longer storage, refrigerate them for up to 2 weeks, separating layers with parchment paper. Allow refrigerated pralines to come closer to room temperature before serving for the best texture.
You can also freeze them in a freezer-safe airtight container for up to 2 months. Thaw them in the refrigerator or at room temperature while still protected from condensation.


